Many people use mechanical hard drives as extended storage or for backups. However, having it running when not in use is an absurd waste of energy and causes wear and tear on the disk. In this article, we will guide you on how to turn off HDD in BIOS.
It’s important to note that this tutorial is not for to SSDs being reliable than HDD, as they have low power consumption, produce less heat, and are noiseless.
Still, in a mechanical drive, it makes a lot of sense because you will save energy of HDD than SSD, prevent it from heating up and wearing out its moving parts, and you will also reduce the noise that the PC makes because even at rest, a mechanical drive always emits noise.
Disabling hard drives in BIOS
The BIOS provides a certain set of parameters responsible for some system data storage chain components. These parameters can be customized to fit your preferences, allowing you to activate or deactivate them as required. Accordingly, the latter will allow you to block access to the hard disk. So you can reconfigure:
- SATA /IDE ports;
- HDD controllers;
- loading hard drives.
Motherboard manufacturers themselves decide how these parameters are displayed in the system menu. Sometimes they are completely set to automatic mode without the ability to influence the operation of hard drives programmatically. However, you can often change and tweak these settings yourself. In general, this requires opening BIOS. Here is the way:
When the device is turned on, start the BIOS by pressing the standard entry key for your computer or laptop model (usually “Delete” or “F2” ). Find the desired hard drive configuration, whether a port, a controller, or a startup option. Deactivate this configuration according to the methods below.
Option 1: Disable the hard drive
The hard drive itself in the BIOS is turned off in two ways: by deactivating the ports or by turning off the controller. Both methods at the hardware level block access to the device system to the selected drive.
Method 1: Deactivate ports
Disabling hard drives through ports is done by deactivating the corresponding parameter. Find this configuration in your base menu and expand it. It is usually located on the “Main” tab but might be hidden in other sections or subsections of the user interface. You’ll also find the name and serial number of the SATA or IDE connector on the motherboard to which your HDD is connected.
Having opened the port setting, you need to find the option to activate it. Sometimes, it has the same name as this section. In our case, for example, such an operation is carried out through the “Type” parameter, where you need to select the value “Not Installed” or “Disabled.” In the end, save your changes.

Method 2: Deactivate the controller
Another way to deactivate the HDD is to turn off the controller chip. You can do this in the hard disk configuration section. Look for the parameter “SATA” or “IDE” with terms like “Onboard,” “Controller,” “Configuration,” “OnChip,” or “Chipset.” Choose the value “Disabled” for it. Then save the settings and restart your computer.

Option 2: Block HDD startup
The second option is to change the startup parameters of the storage device. Among other settings, this section of the basic menu allows you to enable and disable booting from certain media.
It’s important to note that these methods won’t completely power off the hard drive; the operating system will still detect and recognize it… However, the computer would prohibit its launch if any other OS were installed.
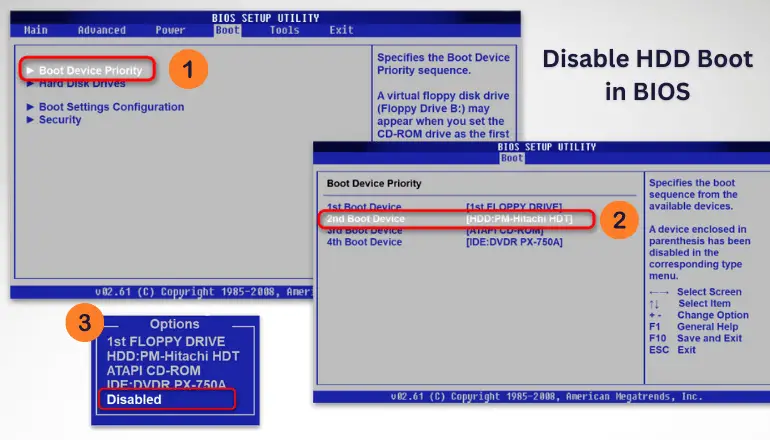
Method 1: Boot Menu
One of the first steps is deactivating the hard disk startup option, usually found in the “Boot” tab of the list of boot devices. However, depending on your BIOS and motherboard, it might be in a different tab or subsection.
Having found these parameters in your BIOS, find the line with the name of your HDD and select it using the “Enter” key. Here it only remains to specify the value “Disabled” and apply the changes. After that, the hard drive will become inaccessible to the bootloader of the base chip.
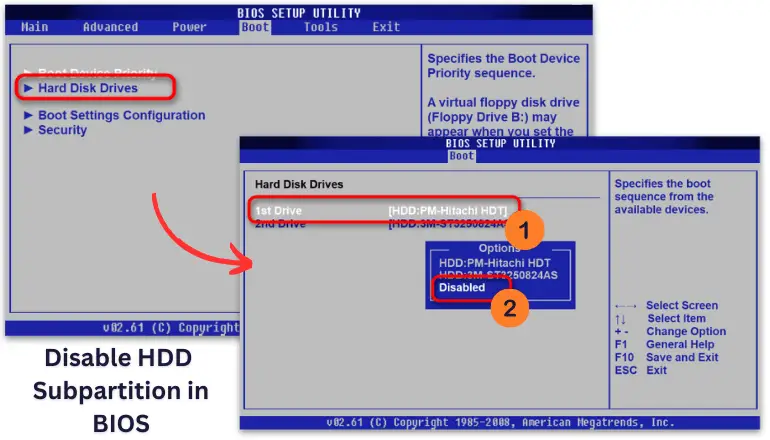
Method 2: Hard Drive Subpartition
Usually, there is a boot configuration specifically designed for managing drives next to the launch options. Through it, you can also block BIOS access to the hard drive.
You can locate these settings in the “Hard Disk Drive” section or another menu related to boot priority settings. Select the required hard drive from the list of connected ones and set the value to “Disabled.” Then the device will become unavailable even in the list of boot drives.
Method 3: Configuring “UEFI Secure Boot”
The Secure Boot option allows you to turn off all unregistered storage devices. This is usually work for UEFI mode BIOS marked in the GPT partition table. If you want the BIOS to see only this type of hard drive, activate this option and set the boot to “UEFI,” as long as it supports. Conversely, if you want to turn off this setting and enable “Legacy,” you can do so.
- Related: How long do external hard drives last? (External HDD Lifespan)
- Also Read: SATA vs NVMe » Comparison of Performance & Transfer Speed
Final Words
The situation when the user has to turn off the hard drive in BIOS is quite rare, but some tasks may emerge. Be sure to save your changes before rebooting the PC.
If you need to access BIOS specific settings after disabling the hard drive, remember that you can reactivate it anytime by reverting the steps mentioned above.